Add Contrast Like a PRO using Affinity Photo
In the Affinity photo contrast tutorial video above, I will show you how you can add contrast to your images in different ways using Affinity Photo, right from a simple contrast adjustment to a more professional way of adding contrast to your images. You can also use the method if you are using Photoshop, with just a little modification.
We will be using an image that I captured on my trip to New Zealand. I captured it a little downstream from McClean’s Fall in the Catlins Conservation Park.
As usual, when you capture images in Raw-format, they come out a bit flat. So, I want to add some contrast to make it pop a bit more and add some depth to the image.
There are several different ways to achieve this.
Get my Beginner-friendly Quick Start Guide to Affinity Photo - for Free
Method 1: Easy Brightness / Contrast Adjustment Layer
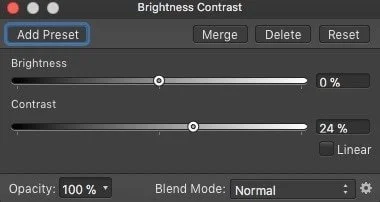
The simplest way is to simply add a Brightness/Contrast adjustment layer and increase the contrast slider. In this case, I think that setting the contrast slider to around +24 % looks nice.
Setting the brightness contrast adjustments in affinity photo
However, this method doesn’t give you much control of how and where the contrast is applied to your image. For instance, a Brightness/Contrast layer will apply an equal amount of contrast to the highlights and the shadows.
Using a normal brightness / contrast adjustment layer to add contrast
Method 2: Using a Curves Adjustment Layer To Add Contrast
With a curves adjustment layer, you get more control of how you add contrast to your image.
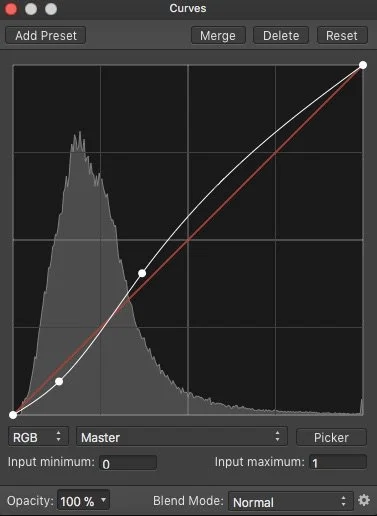
The left side of the curves adjustment dialogue represents the shadow areas in your image, while the right side represents the highlights.
A typical way to use a curves adjustment layer is to make an S-curve and then make your corrections from there if, for instance, you went too far with the shadows.
When you use a curves adjustment layer to add contrast, you can, for instance, lower the shadows more than you raise the highlights, so it is more tailored to the tonal values in your image. This is not possible when you use the more basic Brightness/Contrast adjustment layer we saw just before.
Using curves adjustments to add contrast in Affinity Photo
The Pro Method: Advanced Contrast adjustments Targeted shadows, mid-tones, and highlights separately
The third method is actually just a more precise way to use curves adjustments, where you target specific areas. However, it also gets a bit more complicated from now on, but you will often get better and more professionally looking results if you use this method. It gives you more control of where you add contrast and how much you add to a particular area.
For instance, you might want to increase the contrast in the shadows or mid-tones, but not in the highlights.
Begin by making a selection of the shadows.
Go to Select > Tonal Range > Shadows.
Next, add a curves adjustment layer. Because of the active selection, the curves adjustment layer will only affect the shadows.
histogram showing the current selection of shadows - afffinity photo
This histogram shows that only the shadow values are selected.
By lowering the curve on the left side and raising it in the right side, we can create more contrast that is targeted to our selection only. And currently, this is the shadow tones in our image.
Curves adjustments for the shadows
This the Curves adjustments for the shadows. I have kept the points used to adjust the curves in the left side, which represents the shadow areas.
Next, up we can target the mid-tones by making a new selection of the mid-tones.
Go to Select > Tonal Range > Midtones.
With the mid-tones selected, add another curves adjustment layer and change the curve to set how much you want to darken or brighten the “darkest” part of the mid-tones and how much you want to darken or brighten the brightest part of the mid-tones.
histogram showing midtones being selected
This is a histogram showing that the mid-tones is currently selected.
Curves adjustments made for the midtones. Note that the s-curve is centred around the mid-tones values. (Affinity Photo doesn't update the histogram in the curves adjustment dialogue with the current selection, but the overall histogram panel shows it. You can also see it on the mask.)
Finally, you can do the same thing for the highlights, if you need to address these specifically.
Go to Select > Tonal Range > Highlights.
This is the histogram of the selected highlights.
The curves adjustments made to target the highlights.
You don’t need to create the curves for both shadows, mid-tones, and highlights if you only think that you want to increase the contrast in the shadow areas in your image.
Using curves adjustments that targets the shadows, mid-tones and highlights separately to add contrast in Affinity Photo
You don’t need to use this more complicated method if you find that applying a curve adjustment layer will give you the contrast you think is right for your image.
But it does give you much more control over how your image will look when you make the adjustments more specific.
In my Affinity Macro pack for Photographers, you can use the Pro Contrast macro to make these advanced contrast adjustments where you target shadows, midtones, and highlights separately, with just a single click. After this, all there is left to do is to adjust the curves for each of these to your image and your liking.
If we take a look at these methods for adding contrast, that I have shown you here, we can see that they lead to quite different results.
Towards the end of the video [around 5:37 minutes in], you can see a comparison of the three different methods used in the video. To an untrained eye, the differences can seem small, but especially the shadow areas in the image benefitted from the advanced targeted approach to adding contrast.
As you can see the more control you have the more you will be able to fine-tune the contrast you apply to the specific image photo you are working on.
Which method you use is up to you, but as you get more and more familiar with software like Affinity Photo you will really appreciate the amount of control you can get over the photo editing process.
If you are ready to go beyond the tips in this tutorial, I suggest you take a look at my Affinity Photo Workflow video course, which helps you to use Affinity Photo like a PRO.


