How to Create a Vignette in Affinity Photo?
In both Affinity Photo and Photoshop, there are a lot of different ways you can create a vignette. You can use the radial gradient tool, use a dodge and burning approach, or use the marquee tool. However, the most straightforward approach in Affinity Photo is to use a live Vignette filter. This is similar to using a lens correction filter in Photoshop, but the options are a little different. Follow along in this Affinity Photo vignette tutorial to learn a few different ways of creating vignettes in Affinity Photo.
Get my Beginner-friendly Quick Start Guide to Affinity Photo - for Free
Using a Live Vignette Filter in Affinity Photo
A vignette filter gives you several options on how to adjust the vignette. Using the vignette filter as a live filter means that you work with it non-destructively and you can disable or adjust it through your post-processing.
To apply a vignette filter in Affinity Photo, go to Layer > New Live Filter Layer > Vignette Filter.
Go to Layer > New Live Filter Layer > Vignette Filter - in Affinity Photo
In the Live Vignette dialog, you get the option to change the vignette exposure, hardness, scale, and shape.
The Exposure slider lets you control the strength of the vignette in exposure stops. Pulling it to the left will make the edges darker while pulling it to the left will create a bright vignette.
The Hardness slider controls how soft or hard the transition between the vignette and the center of the image will be.
The Scale slider lets you choose how far from the edge the vignette should stretch towards the center of the image.
The Shape slider allows you to change the shape of the vignette to match the aspect ratio of the image.
Live Vignette Options - in Affinity Photo
When you close the Live Vignette Dialog, you will see that below the active layer, that you applied the filter to, a live vignette filter layer have been added. You can double click at a later time to modify the vignette or uncheck the layer to disable the vignette.
Live Vignette Filter in Affinity Photo
Alternative Approach to Live Vignettes Filter in Affinity Photo
If you want to apply a vignette to an image and want the midpoint off-center, you can use another approach to creating a vignette by using the marquee tool. You can use any of the marquee tools, like the rectangular (with rounded corners), the circular or the freehand marquee tool to create the shape of the vignette that you think fits the image. In the example below I use the circular marquee tool.
First, select the circular marquee tool and change the feather value in the options bar to around 100px. The feather pixel amount will vary with the image size. Smaller images will require a lower feather pixel setting. Larger images above 6000px wide will likely require a larger feather setting. By adding a feathering to the marquee selection, you will create a smooth transition between what is selected and what is not selected.
Next, draw an appropriate selection around your subject. Don't draw the selection too tight around your subject, as it will tend to look too obvious that you added a vignette. Aim for a subtle vignette for a more aesthetic result.
Next, press CMD + SHIFT + I (Mac) or CTRL + SHIFT + I (Win) to invert the selection.
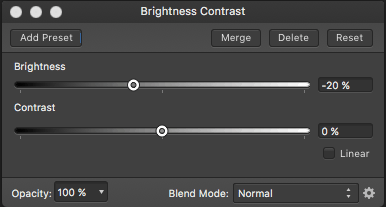
With this selection active, add a new Brightness / Contrast adjustment layer. You can either add it from the right-side adjustment panel or go to Layer > New Adjustment Layer > Brightness-Contrast.
Now lower the Brightness value to create the vignette effect with dark edges that fade inwards towards a brighter spot with the center being the circular marquee selection that you created.
If you instead want the edges to be brighter than the center that you selected just adjust the Brightness slider to the left.
The Brightness Contrast adjustment layer sits on top of your pixel layer affecting everything that is visible below.
You can see the results of using a circular marquee tool to create a vignette that is off-center in the image. In this image, I just wanted to lower the surroundings a bit, so it doesn't compete as much with the penguin. You could opt for a stronger effect if you want to, however, I prefer to keep the vignettes quite subtle.
Concluding words
As mentioned in the beginning, there are a lot of ways to create vignette effects in Affinity Photo. However, by mastering the two techniques covered in this post, you can create any vignette effect that your heart desires.
If you would like to take some shortcuts in Affinity Photo, take a look at the Affinity Photo Workflow Video Course.


